BLOCK MASONRY
Generally we are using in both residential and commercial buildings Hollow and Solid Block masonry as per site requirement.
Specification And General Guidelines For Block Masonry
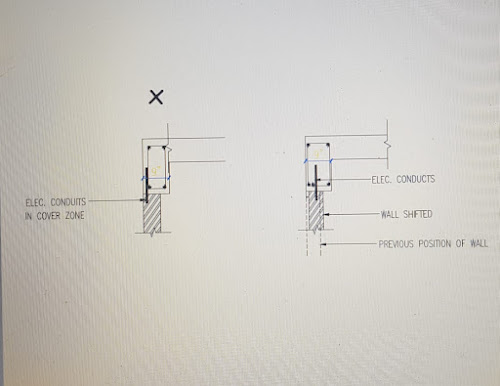
1) Before starting any block work, prepare masonry layout on Typical Floor Plan (Architecture Plan/ Chaapkam drg.). Thickness of each wall to be marked on plan in different colours (Legend Type) and to be approved by the Project Incharge.Drawing is prepared before starting of first slab to put Electrical Conduits.
2. For H/B Ratio for less than or greater than 4 meter long masonry wall, the specs are given in below Para’s.
3. At the time of deciding the thickness of block for that particular wall, note that H/B ratio should not be greater than 20 for all walls less than 4 meter in length & for wall which is greater than 4 meter in length, H/B ratio should not be greater than 18. Where H = Height of block masonry and B = breadth of block masonry including plaster on both faces of block masonry.
NOTE: Please note that the above condition will not be applicable for wall having opening e.g. Door, Window, RCC Grill, etc. touching beam bottom and the space between two openings does not exceed more than 4 meter.
FOR EXAMPLE
CASE – 1 If wall is less than 4 meter, H/B ratio should not be greater than 20.
Example (A).
Height of block masonry (H) = 2400
Wall Thickness (4)” = 90
Thickness of both side Plaster of Wall (15+15) = 30
Breadth of block masonry including both side plaster (B) (90+30) = 120
H/B = 2400 ÷ 120 = 20.
But required H/B should not be greater than 20.
Therefore OK. Use 90mm (4”) Block
Example (B).
Height of block masonry (H) = 2700
Wall Thickness (4)” = 90
Thickness of both side Plaster of Wall (15+15) = 30
Breadth of block masonry including both side plaster (B) (90+30) = 120
H/B = 2700 ÷ 120 = 22.5
But required H/B should not be greater than 20.
Therefore not OK. Use 125mm (5”) Block and again check H/B ratio as explained above.
FOR EXAMPLE
CASE – 2 If wall is Greater than 4 meter, H/B ratio should not be Greater than 18.
Example (A).
Height of block masonry (H) = 2400
Wall Thickness (4)” = 90
Thickness of both side Plaster of Wall (15+15) = 30
Breadth of block masonry including both side plaster (B) (90+30) = 120
H/B = 2400 ÷ 120 = 20.
But required H/B should not be greater than 18.
Therefore not OK. Use 125mm (5”) Block and again check H/B ratio as explained above.
Example (B).
Height of block masonry (H) = 2400
Wall Thickness (5)” = 125
Thickness of both side Plaster of Wall (15+15) = 30
Breadth of block masonry including both side plaster (B) (125+30) = 155
H/B = 2400 ÷ 155 = 15.48
But required H/B should not be greater than 18.
Therefore OK. Use 125mm (5”) Block.
4) 5” Hollow block masonry compulsorily to be used at window sill (external wall), D.B. Board wall and Toilet down-take line wall.
5) Before starting the blockwork for the first time Chhapkam (masonry layout) to be done for complete floor and to be approved by Project Incharge, before going on blockwork. Below picture shows first layer of Block Masonry.

6) On typical floor, Chhapkam must be done every floor and before starting of blockwork, concerned Sector Engineer / Senior Engineer / Senior Site Engineer / Assistant Senior Site Engineer must check the Opening, Room dimensions, Position of Door Frames and Windows as per Architecture working drawings.
7) Patli concrete to be cast with shuttering where block masonry is coming in 65/250mm sunk, to maintain the block masonry in one level and to avoid cutting the block for the same.
8) After approval of Typ. Masonry layout, give the material requirement for block masonry work i.e. (Block, Cement, Silpoz, Chemical for mortar, Chemical for bonding, Door frame, Hold fasts, Nails & screws, Coal tar (black Japan), RCC Grill, etc.)
9) Erect the door frame first after approval of Chhapkam and then start the block masonry. No Block Masonry shall continue without door frames to prevent gap between wall & frame.
10)In case any elevation feature coming from column / Shear wall (which are smaller in size say 4” etc.) as shown in the sketch, same should be brought to the notice of the Project Incharge. Such features shall be avoided as far possible from durability point of view.

11) In case of toilet where wall is NOT FLUSH INSIDE, we will provide 65 mm sunk (90mm) in the beam as shown in the below figure for all the cases i.e. for 4” AS WELL AS FOR 5” walls. In case of 4” wall, inside face of block masonry is exactly flush with beam. In case of 5,” BLOCK masonry 1” portion of block masonry will hang as shown in the figure (Detail-X) which will be taken care of by WATERPROOFING CONTRACTOR, This is done to avoid any kind of offset in the toilet which obstruct the water proofing.

12) Cover all the ducts and lift shaft opening by block masonry upto 1200mm (6 nos.block height) for safety purpose.
13) Use 43 grade OPC cement with the proportion of 1:6 (43 OPC: Silpoz /Pozoplast) and for PPC cement with the proportion of 1:5 (PPC: Silpoz /Pozoplast) for block masonry.
14) Clean the RCC surface with Ghadai & water (removing patrapatti, masking tape, cement slurry, plywood pieces, nails, etc.) before approving chaapkam.
15) Plugging of column bolt holes with cement mortar 1:1 (cement: sand) ratio.
16) Application of Hack-aid / Flexecrete with chaat coat of 1:6 ratio for PPC cement with Silpoz / Pozoplast OR 43 OPC cement with 1:8 ratio OPC cement with Silpoz / Pozoplast with addition of chemical Cebex 112 – 300ml / Bag of Cement. OR M.C.MISCHOEL A.E.A 300 ml / Bag of cement.
NOTE: Hack-aid Plast - Hack-aid is a single component bonding chemical in liquid form which can be applied directly on the RCC surface with brush. After application of Hack-aid wait up to 10 minutes and when it is tacky, apply chaat coat over it. Consumption of Hack-aid is 10 sq.m / liter. Single Coat. (Hack-aid plast Manufactured by Sunanda Chemicals Company)
17) Pre-wetting of block should be done before 2 hrs. & it should be surface dry at the time of using it.
18) Use metal tray or Kundi to prepare mortar and water should be compulsorily measured by 5 ltr. tin.
19) Preparing of mortar for block masonry and plaster with different grade of cement
i). If PPC is used for block masonry and cement plaster, use proportion of 1:5 (PPC : Silpoz / Pozoplast) Silpoz / Pozoplast / Fast track = 50 kg. bags.
ii). If OPC 43 is used for block masonry and cement plaster use in proportion of 1:6 (OPC 43: Silpoz / Pozoplast)
For above proportion of mortar, chemical CEBEX 112- 300ml/bag to be used.
20) Carry out pre-wetting over chaat coat done on the column and beam. It should be saturated surface dry at the time of doing blockwork masonry so that there is a good bond between block and chaat coat since many times it is found that mortar between chaat coat and adjacent block is of poor quality and becomes powder when removed, indicating insufficient curing of the mortar.
21) While doing block masonry, empty cement bags must be laid at bottom to collect Padtal maal which should be remixed along with fresh mortar and to be consumed within one hour.
22) In one day, block work to be done up to 1.2 meter (1200mm) Maximum.
23) The thickness of mortar joint (both vertical and horizontal) should be between Minimum 9 mm to Maximum 18 mm. For maintaining this thickness of joints, all masons should have Thickness Kanda.


24) Vertical joints of the block masonry should be Staggered.
25) At the time of hollow block masonry, mason must use Wooden Patti to prevent mortar falling in the cavity of hollow block masonry. Thus wastage of mortar is reduced.
26) Provide 8 or 10 mm dia. Reinforcement bar on every 3rd layer of block masonry. For 4”, 5” and 6” hollow concrete block masonry / 4” & 6” solid Siporex block. This provision, to be done only for internal wall (irrespective of length and height).
NOTE: Use Re-bar in cut pieces with min. 300 mm lap.

27) Provide 8 or 10 mm dia. Reinforcement bar on every layer with 300 mm anchorage on each wall, if two walls touching to each other but not in right angle.

28) Provide vertical stiffener in wall which is greater than 4 meter in length as per procedure given below.
a) Insert 2 nos. of 12 mm dia. Bars vertically at every 4 meter through hollow cavity in the block. These bars shall be grouted by cement grout with 1 part cement, 1 part FA-II & 2 parts CA-I. This will act as stiffener in case of longwall
OR
b) Provide 1 no of 10 mm dia. Bar at every 1.5 meter and grout same as above.
NOTE: The above instructions to be followed only for 4”, 5” & 6” hollow block masonry and not applicable for solid Siporex block masonry.

29) For long wall (wall greater than 4 meter) and beam depth lesser than 500mm preferably provide 4” or 6” solid Siporex block masonry above this beam or slab to reduce dead load on beam, only after such cases should be brought to the notice of concerned authority or RCC Consultant.
30) For block masonry greater than 4 meter long do not provide top most layer of block at the time of regular block masonry. (irrespective of beam depth). Top most block of masonry shall be done after approx. one month of the block masonry done on the above floor to allow initial deflection to take place of the Beam and to avoid cracks in block masonry due to deflecting of Beam.
31) As far as possible, plumb of blockwork must be checked on the same day so that if any defects can be rectified immediately with minimum loss of block and mortar.
32) Raking of joints should be done on the same day, since raking can be done properly, as joints are freshly filled.
33) Dantta ( Teeth ) to be left for future extension block masonry.
34) Hollow made solid block to be used at:
1. Top most layer of wall
2. Window sill layer
3. Below RCC grill.
34) Top most block should be tightened with mortar and course aggregate.
35) Date of work should be written on block masonry on the same day.
36) Clean the flat after block masonry is over.


Comments
Post a Comment